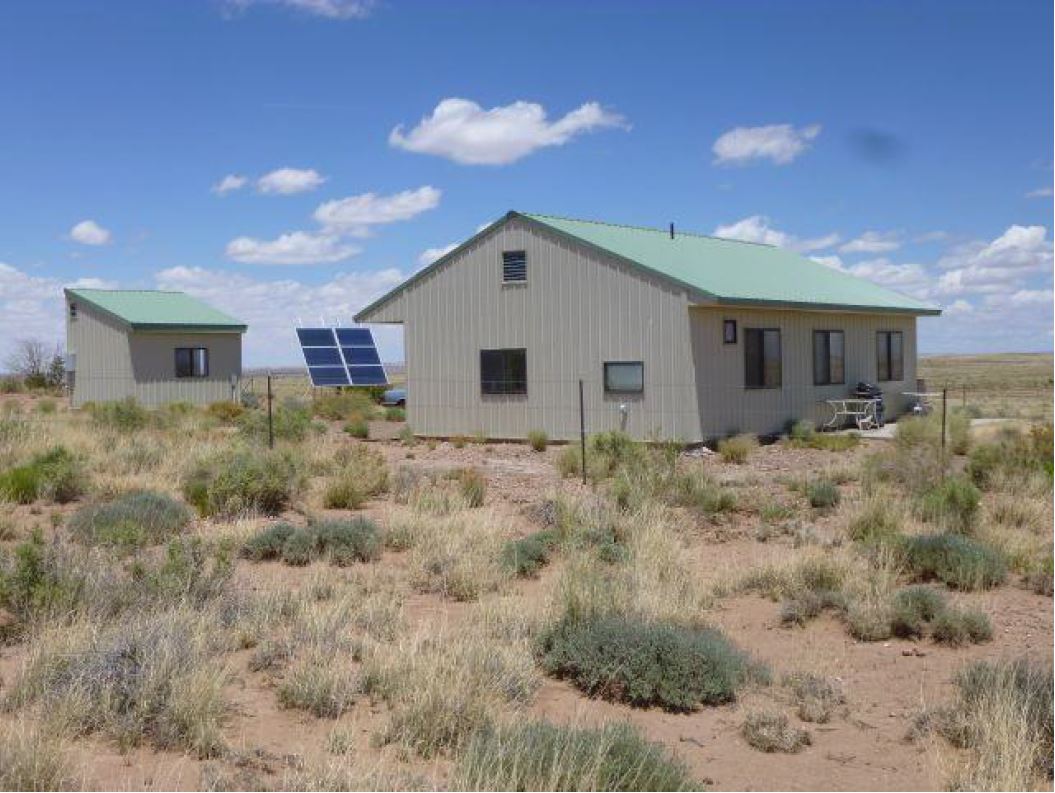
Desert Moon House:
Construction of a Healthy House
This article describes the materials, methods and process used to build a healthy house for someone with extreme chemical and electrical sensitivities (MCS and EHS). The house is located in northeastern Arizona, USA. The level of detail is suitable for contractors.
Keywords: healthy house, environmental house, construction, how to build,
MCS, chemical sensitivity, materials, grout recipe, thinset recipe,
sealing walls, super insulation, radiant floor heat
The foundation
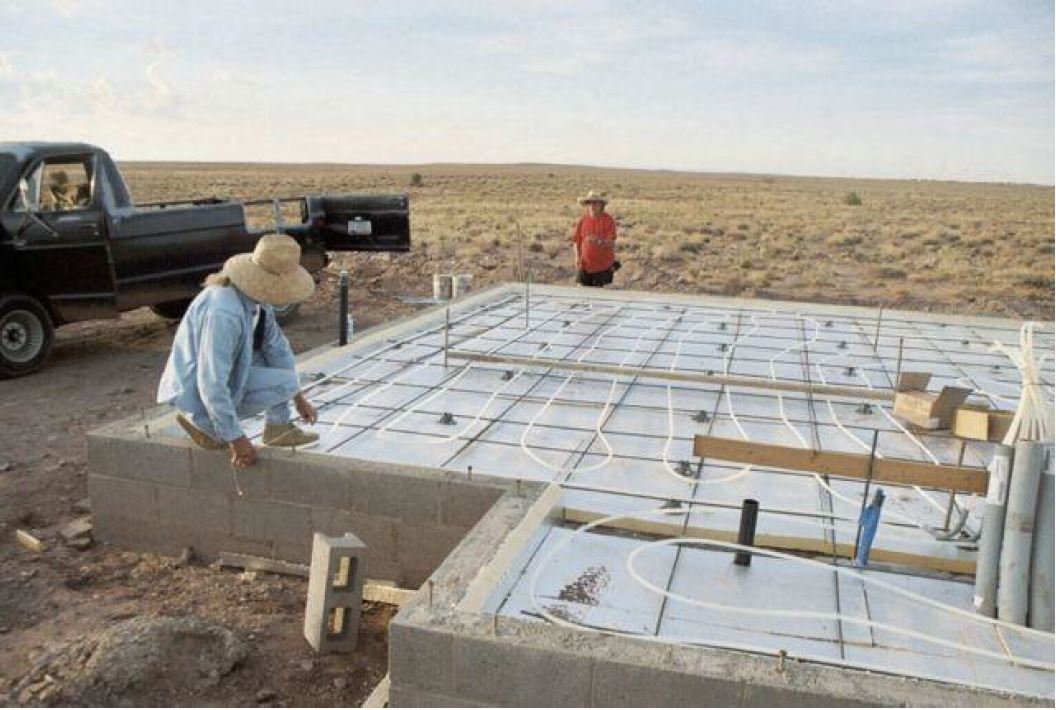
The foundation is ready to be poured. The foam boards, the PEX tubing and the
stem walls can be seen.
The first part of the house itself was the foundation. Heavy machinery dug down to solid soil and rock, and then built up stabilized gravel to make a bed upon which the concrete slab was poured. This house has a radiant floor heating system. Such an in-floor heating system requires a more complex foundation in order to work well. Since the slab will be much warmer than usual, it must be well insulated to avoid excessive heat loss. This is also the case in warmer climates, such as Arizona.
We used a stem wall, which is a wall of concrete blocks around the perimeter of the house. The hollow blocks were filled with concrete, so they became a solid concrete wall. The outer walls of the house were then built on top of this stem wall. On the inside of the stem wall was placed a two-inch (5 cm) thick layer of polyisocyanurate rigid foam insulation boards, to insulate the floor from the un-insulated stem wall. The boards were placed vertically up against the inside of the stem wall, and cut so the top tapers off towards the stem wall (see diagram on page 4). That way the insulation does not stick up out of the floor. In retrospect, the tapering was only needed at the front door, while the extra thick wall would otherwise cover it. Precious insulation value was lost by this oversight.
These same insulation boards were also put under the slab, to insulate it against the ground below the house. These insulation boards are very tolerable and have an excellent insulation value.
Under these boards was placed a membrane of 6 mil (about 0.15 mm) plastic, which both retards any radon gas infiltration and prevents moisture from being wicked upwards. We used multiple overlapping layers.
Four loops of 1/2-inch PEX tubing wind their way through the concrete slab to heat the house. The PEX tubing was secured to the rebar using steel wires, though plastic ties could also have been used. Without these wires, the tubes would float on top of the wet cement when poured, so it is important to have it firmly secured everywhere. See separate article about the heating system for further details. The concrete was poured in the cavity inside the stem walls, on top of the insulating boards, embedding the PEX tubing. Normally, the slab would be four inches (10.5 cm) thick. This slab was made five inches (13 cm) thick to add more thermal mass to help even out the day/night temperature swings of the high desert climate, so an air conditioner was unnecessary.
The concrete company was instructed to deliver a basic mix, without any additives (called admixtures). These chemicals make the concrete easier to work with, make it cure faster, be frost tolerant, etc. A concrete without any admixtures cannot be poured during a hard freeze, and it must be wet cured. Wet curing was done by covering the cement with a plastic tarp for about three days, so the moisture does not evaporate and dry out the top layer of the concrete. It seemed very straightforward and seemed to require no extra time. The owner just peeled off the tarp after three days.
The contractor was instructed not to pour any diesel fuel on the finished concrete slab, which some contractors routinely do to create a smooth finish.
The porch and the slabs for the shed and the outbuilding were monopoured, using wooden forms, as there were no stem walls. These forms were made of 2x4 inch wooden boards that were purchased for this use. This way there were no reusable forms, as they would have to be greased.
The stem wall was built so the floor of the house was at least six inches (15 cm) above the soil on all sides. This provided protection against termites and flooding.
Walls
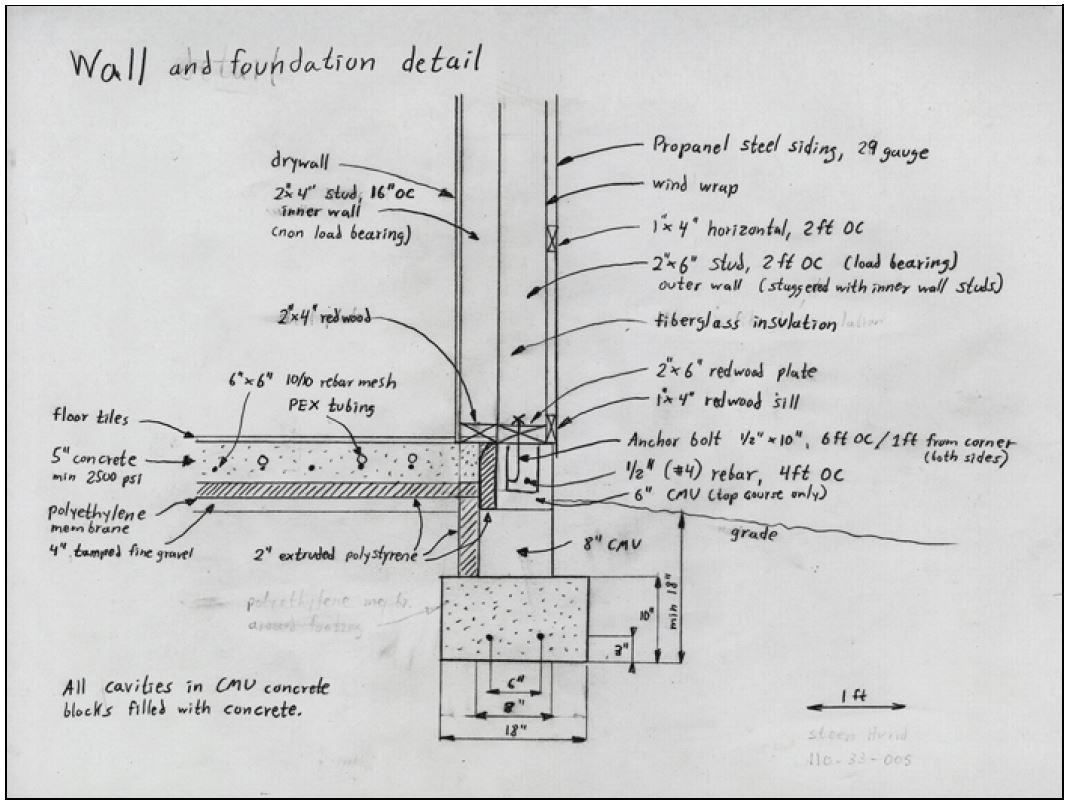
The walls of this house were built as a conventional stick-framed American house, except they were double. There is an outer wall made of 2 x 6 inch studs, and an inner wall made of 2 x 4 inch studs. The studs were staggered to prevent thermal bridging. These two walls together comprise the exterior wall of the house, with a combined wall-cavity of ten inches (25 cm). With fiberglass insulation, that makes for an R-value of 32. Double-walled houses are common in cold climates, like Canada and Alaska.
The lumber used to frame the house was Douglas fir and some hem fir, as they were easily available and less odorous than pine. There are wood types that have less terpenes-such as maple and poplar-but they were not affordable for such a large project. All lumber was kiln dried, which has less tendency to become moldy than lumber that has simply been air dried.
Steel studs were not used, as these would allow more heat loss through the walls, due to thermal bridging. Some studies suggest fully half the insulation value of the wall is lost by using steel studs. The thermal bridging can cause condensation of water vapors, which might cause mold to grow.
The bottom plate of the walls is redwood. Redwood was used instead of pressure treated wood, which is toxic. Redwood is an excellent alternative, as it decays extremely slowly, and thus poses less of a risk for mold growth due to any moisture that could collect at the bottom of the wall. Unfortunately, redwood trees grow very slowly and are not really a renewable resource. Redwood contains high levels of tannin, which both deters molds and insects. It is a very aromatic wood, but sealed inside the wall that was not a problem. There are other types of lumber that are rot-resistant, such as black locust, which may be available in some areas.
With the double-wall construction, the corners became complicated, with cavities entirely closed in by studs. Fortunately, the framers thought of putting insulation in these cavities before they nailed the last stud in place.

The walls were then covered with housewrap, which is a plastic barrier that slows down air movement. The type with tiny holes in it was used, as it was important that the walls could breathe and not let moisture get trapped. A moisture barrier was later placed on the inside of the wall, according to the local building code.
Horizontal 1 x 4s were then nailed to the outside on the housewrap, which is what the siding was later nailed into. 2 x 4s should have been used instead of 1 x 4s, as they are stronger and cost the same. The bottom horizontal board should also have been redwood, for deterring mold growth. The housewrap could also have been caulked to the sill plate, to deter air movement.
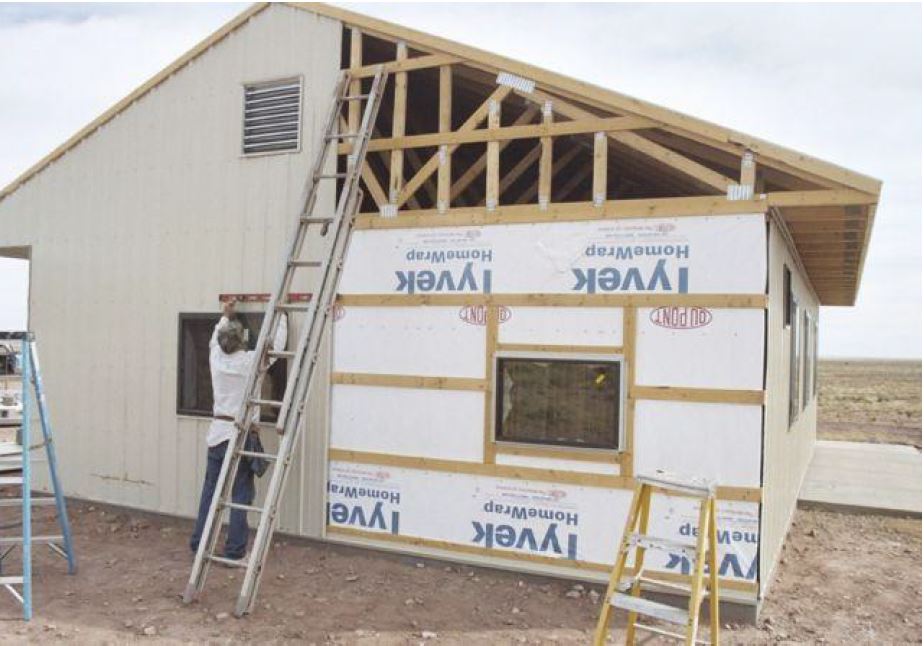
The roof

The roof trusses were manufactured by a company which trucked them to the building site. They were made of lumber, which worked fine, as they are outside the building envelope. Steel trusses were not available locally, would have cost a lot more, and were not necessary.
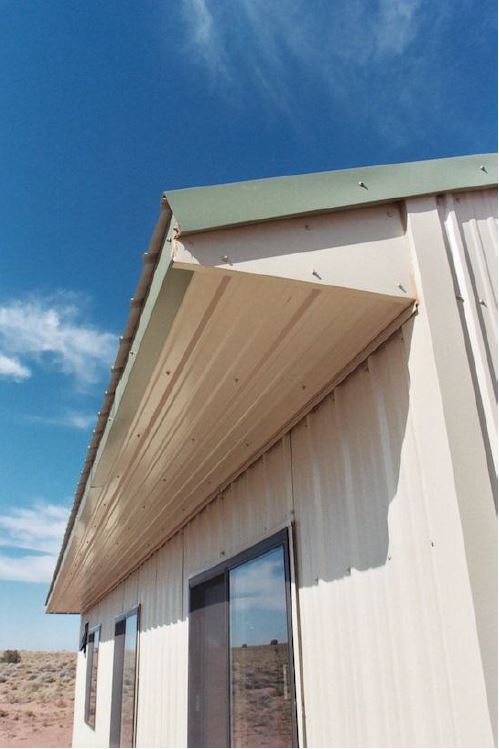
In a conventional house, the next step is then to cover the trusses with toxic plywood (called decking), cover it with a tarred membrane and then nail toxic tar shingles to them. This house was done differently, following the practices and materials used on many barns. Instead of installing the plywood decking, a series of horizontal 2x4s were nailed on top of the trusses, so it looks like a giant ladder (see above picture). These are called purlins. The 2x4s were installed 18 inches (45 cm) apart (OC to be precise).
A steel barn roof was then installed over these purlins, using special screws with large heads and a gasket. The roofing material was 26 gauge steel plates of a type called Pro-Panel II, manufactured by Metal Sales. The panels are attractive looking, available in many colors, are guaranteed for 45 years, and came without any oil residues, making it a low-toxic, low-maintenance roof. The special screws are sold by the same company, in colors matching their panels.
The panels are ordered in custom lengths from the factory, which reduces waste and cutting work on-site. To make sure they will fit, the actual measurements were taken after the house was framed.
A roof without decking is more noisy in heavy rain than one with decking.
Doors and windows
The windows were then installed in the walls. Double-glazed aluminum framed windows were used, as they do not need to be painted like wood-framed windows, and were safer than the vinyl-framed windows. Aluminum frames conduct heat more than the other kinds, which is the drawback for these types of windows. The most energy efficient models were the Regal View series from MI Windows. They have a built-in thermal break that the other aluminum models do not have.
The exterior and interior doors were steel doors from Stanley. Stanley has since been bought by Samsonite, which changed the design of their doors so they now use manufactured wood around the edges. The steel doors were bought a month early, so they could be offgassed.
The doors came with an off-white primer, intended to be painted to fit the dÈcor of the house. The doors were not painted, but left as is.
The interior doors were fitted with custom frames of poplar by a local shop, instead of the typical odorous pine. The door frames are the only exposed wood in the entire house.
Siding and trim
The siding had to be mounted after the windows went in. The siding is the same material as the roof (i.e. Pro-Panel II), but in the thinner 29-gauge version. The fittings around the windows and the door needed a lot of caulking to ensure that rain would not enter the wall through the spaces there. Earlier houses, that did not caulk heavily here, have had problems with rain seepage.
The "rat guard" strips were installed at the bottom of the walls, to prevent small animals from nesting inside the wall.
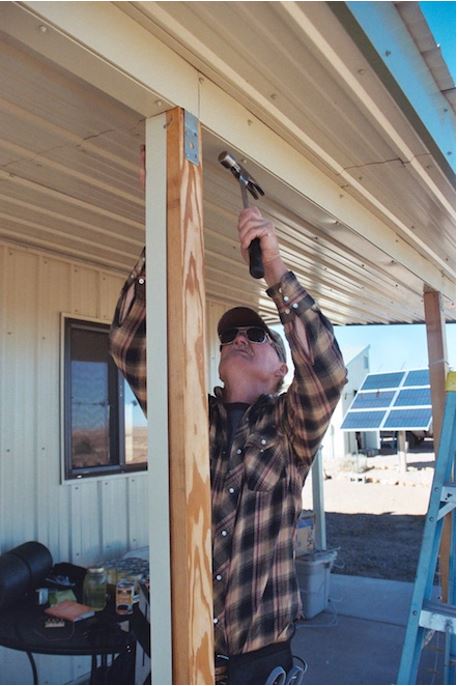
The roof over the porch was then built, using lumber and Pro-Panel II.

Wrapping all exposed lumber in steel, for zero maintenance
No wood is exposed to the weather, eliminating the need for any toxic paints or other wood treatments. All exposed wood is covered by steel plates. For large areas, such as the soffits, the regular Propanel was used, as it vibrates less in high winds than if flat plates were used. For smaller areas, 29 gauge flat stock steel was used (also from Metal Sales). It is time consuming work to bend pieces of metal to wrap around exposed posts, beams and other details, but then it will be non-toxic and maintenance-free for decades.
Inside work
The house was now closed in against rain, and then the inside work could begin. At this stage, it looks like the house is almost done. In reality, it is only the half-way point, perhaps not even that far. The interior work takes a lot of time and often doesnít look like much work, but it is.
The interior walls were put up as standard 2 x 4 wood frames, with a few walls using 2 x 6 when there needed to be room for plumbing. Douglas fir was used mostly, but also a little hem fir, when Douglas fir was not available. Also here the bottom plate was redwood (for mold protection).
Electrical work

Wall box sealed with silicone caulk. Expanding foam in a spray can works better.
The wiring was done with standard ROMEX, but of a brand that did not have any lubricant added. ROMEX contains flame retardants and plasticizers, but that was deemed acceptable, as they would be sealed up inside the wall. The lubricants used on some brands (such as SimPull) were too bothersome.
The wall boxes for switches and outlets were plastic, not steel, as there were concerns about possible stray currents if the foil on the walls was in contact with the electrical ground (through the steel wall boxes).
The wall boxes were sealed around the cables using caulk, so air could not penetrate from the wall cavity. A better sealer is spray foam in a can, such as Great Stuff brand. Once the wall boards were installed and foiled (see later), aluminum tape was used to seal the cracks around the wall boxes as well.
No recessed lights were used in the ceiling, as those are very hard to seal well. Instead, dome lights were used. Some of them had pieces of insulation on the back, which were removed and replaced with crumpled aluminum foil prior to mounting. The insulation reduces the heat from the light bulb going upwards, as a fire protection. Without this insulation, lower wattage light bulbs should be used, than is stamped on the fixture. The fixtures in this house are rated for 100 watts, and are actually used with 50 watt bulbs or less. Removing the insulation may be against building code.
The light fixtures were "burned in" by having the lights on for a couple of days.
The house is off the grid and powered by a DC-only 12 volt solar electric system to make the electromagnetic radiation in the house extremely low. This system is described in detail in a separate article (see link at bottom).
In case regular AC grid electricity is ever used in the house, some simple low-EMF wiring methods were used:
- twisted ROMEX cables
- double-poled kill switch for bedroom
- switched GFCI outlets
- plastic wall boxes
There are detailed descriptions of these and other kinds of low-EMF wiring methods elsewhere on this web site (see later).
The house was wired for phone, computer network and coaxial TV, as the wiring was much easier to install during construction. Using the wireless alternatives are a health hazard for sensitive people.
Plumbing
The graywater and blackwater (sewage) lines were done fully conventionally using ABS pipes and regular glues.
The freshwater lines were copper pipes that were soldered together (called "sweated"). Regular solder was used, as it is all lead-free now. Most modern builders use PEX tubing (cross-linked polyethylene), which is much faster (thus cheaper) to install than copper. It was a judgment call to not use PEX.
The underground pipe from the well to the house is PVC plastic. PVC is not wonderful, but it was the only realistic choice. PVC pipes develop a biofilm on the inside walls, which then shields the water from any plastic leaching.
Since the house has its own well, a pressure tank was needed. The Dayton Electric model 3YA56 was chosen. Its bladder is of an ethyl vinyl acetate instead of the typical rubber bladder, which makes the water taste bad.
Insulation
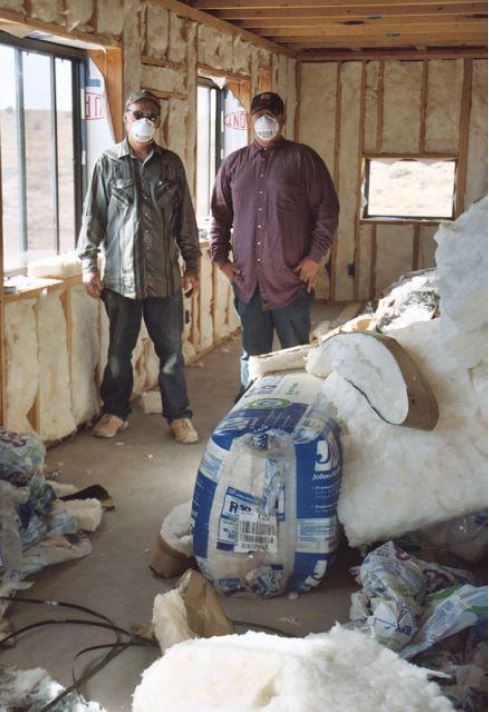
With the plumbing and electric completed in the walls (called rough-ins), it was time to put insulation in the exterior walls and the ceiling. We used formaldehyde-free fiberglass batts, that are manufactured by Johns Manville and available through some hardware stores. The batts came with a brown paper backing, which was torn off and discarded because it was toxic and because we used aluminum foil as vapor barrier instead.
The most important 1/10th of an inch
The innermost part of the walls, ceiling and floor are the most important part of a less-toxic house. Whatever is in the last 1/10th of an inch, is what the person living in that house will be breathing in all day and night. More than anything, it will determine and if move-in will happen.
The most common wall covering in America is drywall sheets. They are mostly made of gypsum with a brown paper backing. There are gypsum mines, but much of today's gypsum is a waste product from coal-fired power plants, or even recycled from demolished buildings. Some manufacturers also add formaldehyde to their gypsum. It can take years for drywall to offgas.
Gypsum drywall was used in this house, but it was chosen with great care and then sealed airtight, so it was not a problem.
Shortly before the drywall was needed, a sample sheet of each available brand was purchased from each local vendor. A piece of each sample sheet was put in a one-liter glass jar and left in the sun. The sample that smelled the least obnoxious was the one selected, and the whole batch was immediately ordered for delivery.
Both the walls and ceiling were covered with drywall. The drywall sheets were mounted an inch (2.5 cm) above the raw concrete floor so they would still be well above the floor when the tiles were installed. This was a precaution if there was ever flooding, so the drywall would not wick up the moisture and get moldy. The air gap was later covered by a kickboard.
The seams between the wall boards were taped with regular paper joint tape and then covered with Murco M-100 joint compound. This is a special hypo-allergenic product made by Murco Corporation in Fort Worth, Texas. The M-100 product is basically wheat starch, calcium carbonate and mica.
No drywall was used in the bathroom, as drywall for moist environments contains biocides to deter mold growth (most are marked with a green color). Cement boards are better when tiling, anyway. The exterior bathroom wall and the ceiling were covered with a moisture barrier called Tu-Tuff, which is a polyethylene plastic that is tolerated by most people with MCS. Then all walls and the ceiling of the bathroom were covered with a cement board called HardiBacker, which was tested to be more tolerable than the other available brands. These boards cost about six times as much as drywall, and are also more labor-intensive to install. We did not use the HardiBacker strips to cover the seams, because they were very toxic. This resulted in some cracking of the tiles, so some sort of strips or caulk should have been used there.
HardiBacker was also used to cover the window sills and around the windows, which was later tiled. Strips of Tu-Tuff were put behind the HardiBacker as a moisture barrier.
Foiling the walls and ceiling

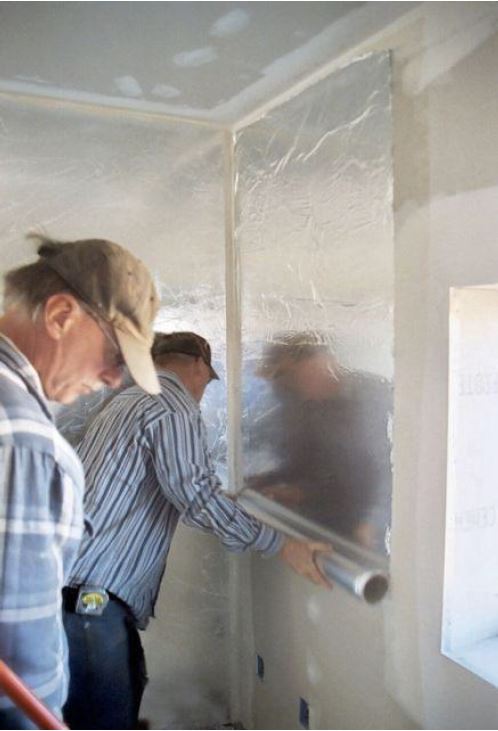
The drywalled walls and ceilings were then covered with aluminum foil, as if it were wallpaper. The aluminum foil was purchased in 1 mil (0.001 inch, 0.025 mm) thick rolls that were 3 feet (1 meter) wide. These came from Alufoil (see vendor list). For smaller areas, heavy-duty aluminum foil from the grocery store was used. Grocery store foil could have been used throughout, but it would have been a lot more work and a lot more seams. It took less than three of these 225-foot (70 meter) rolls to do the entire house.
The foil was put up with a wallpaper wheat paste from the local hardware store. Many manufacturers of wheat paste have since added biocides to their products to prevent mold growth (including the product we used). An alternative is to use home-made pastes made of wheat or corn.
A special smoothing tool was used to smooth out the wrinkles in the foil, and remove excess wheat paste. It will tend to streak and mar the aluminum foil, but this will not be visible once it is painted. The smoothing tool is available from Hyde (see list).
Some earlier users of the present system had problems with the foil blistering after some months. There were no problems at all with this house, so it seems the procedure has been worked out perfectly now. It includes:
- heat up water until almost boiling, before mixing the powder
- soft water appears to work best; add a little salt if using hard water
- mix the exact amount of powder, do not skimp
- if it gets lumpy, add heat or maybe a little water
- apply the paste to the wall with a roller, then roll the foil over it
- apply one coat of wheat paste and let it dry overnight, before a second coat with the wall paper
- do not use all the mix in the bucket-throw away the bottom few inches, it will have become diluted with the joint compound from the wall
- make sure to use the smoothing tool to remove excess wheat paste, by pressing it out the sides of the foil
- only do one side of a wall in a day, to limit moisture buildup
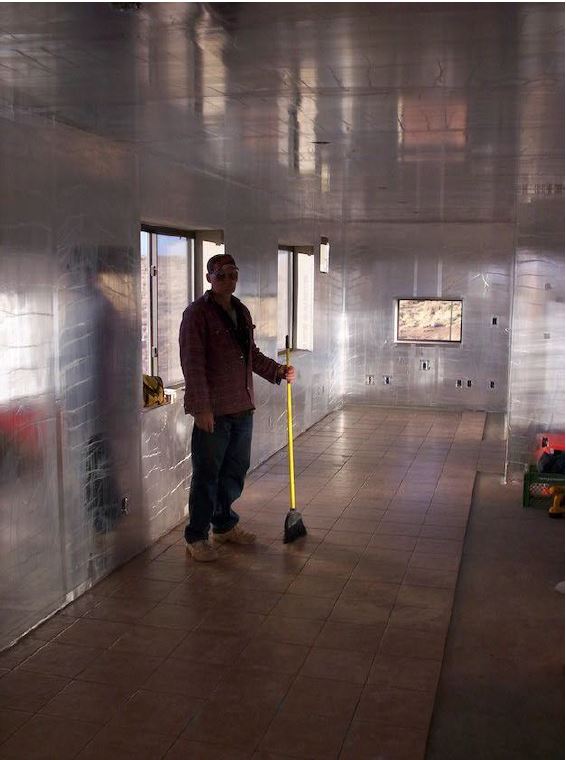
The aluminum foil has three purposes: it seals in the fumes from the walls (i.e. from the insulation, wiring, drywall and lumber); it is the moisture barrier for the house, and it also provides some shielding against radio-frequency radiation (as does the steel siding and roof)
Make sure there is no other moisture barrier, as there canít be two, or moisture may eventually be trapped inside.
The seal will eventually start to leak a little after several years. By then, the contents of the walls will have largely offgassed. No seal is perfect. It is thus still important to use less-toxic materials inside the walls and not fully rely on the seal to keep it at bay forever.
The strips of foil were put up on the drywall with a small gap, so they did not touch and did not overlap. When they were dry, the seams were taped using two-inch (5 cm) wide acrylic adhesive aluminum tape from E. L. Foust. The more common Polyken aluminum tape does not have a strong enough adhesive that will last.
The aluminum tape was applied using plastic ice scrapers for car windows. They make the tape adhere better to the rough surface, when using the dull side of the scraper. Steel scrapers wonít work, wooden ones probably would.
The top and bottom of the drywall was also taped, to make airtight seams against the raw concrete floor and the ceiling. Then the ceiling was foiled and taped in the same way.
The bottom seam was later covered with floor tiles and baseboard tiles. In the utility room, the seam was instead covered with a strip of aluminum with an L-shaped profile, which was fashioned out of aluminum flashing material.
Finally, all wall boxes and other wall penetrations were also taped. These boxes had already been sealed, where the wires come through.
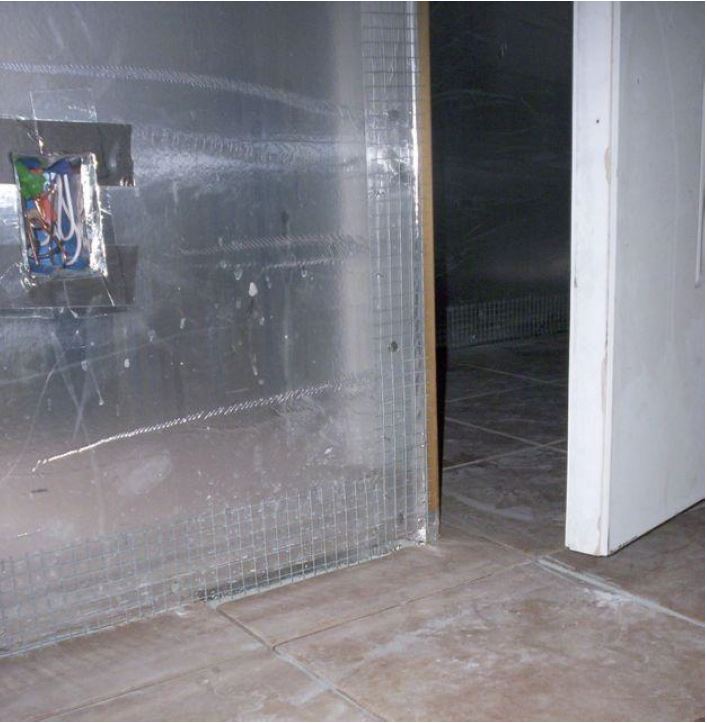
The edges of the walls, and around wall boxes, are sealed with aluminum tape.
The steel mesh is for trim and baseboard tiles. Note the small gap between the floor and
the bottom of the drywall.
Building codes and using sealed walls and ceilings in other climates
This building method with foiled walls has been used in a dozen homes, but only in a desert climate. It complies with the local building code which stipulates that ìa vapor barrier shall be installed on the warm-in-winter side of the insulation.î Building codes for warmer and dry climates, such as southern Arizona, tend not to require a vapor barrier (or prohibit one).
In humid climates, there may be a problem for the moisture from the wheat paste to travel through the gypsum board and evaporate from the enclosed space inside the wall. Trapped moisture can cause mold growth.
It is not possible to use this method on exterior walls in warm and humid climates, such as Florida and East Texas. In those areas the walls must be allowed to breathe, or the moisture barrier must be placed on the outside of the insulation to avoid condensation in the walls, so foil cannot be used to seal those walls.
Check the local building code. In areas that neither prohibit nor require an inside vapor barrier, discuss with a building professional.
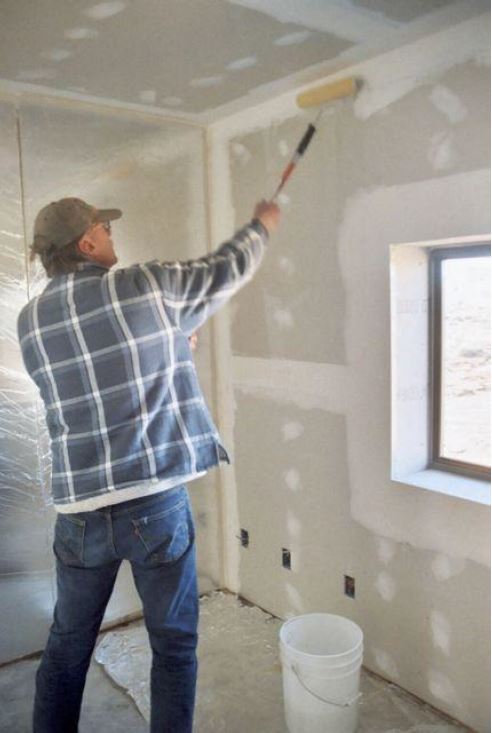
Preparing the walls for paint
The now aluminum-covered walls and ceilings were then washed with a solution of Red Devil TSP (which doesn't contain any phosphate), that came from the local hardware store. A weak solution of three teaspoons to a bucket of water worked well to remove oxidation and any oils from the manufacturing of the foil.
A putty was then custom made to spackle around the taped seams, so the surface is completely smooth and the seam will not show through the paint. The putty used was experimental, with a recipe that is not yet available to the public. Murco M-100 can be used instead, for the same result. The paint is covered later in this article.
Tiling
Tiling was done after the walls were foiled and sealed against the concrete floor.
There is a lot of tile work in this house. Besides all the floors, there are tiles covering the walls and ceiling in the bathroom to prevent mold growth there. There are also tiles around all windows and doors, and along the bottom of all the walls, where there normally would be wood trimming. The countertops in the kitchen and the bathroom are also tiled, using three layers of 1/2-inch HardiBacker cement board underneath for stability. There is also a backsplash of tiles behind the stove and the kitchen counter. The backsplash rises 24 inches (60 cm) above the work surface, as the paint used on the wall does not handle splashes well.
The color of the floor tiles was chosen so the red dust of the desert does not show up as well.
The thinset and grout used were home made, as the commercial mixes all have problematic chemical additives. The recipes are provided later in this article.
The home made grout and thinset have much less of an odor, but they also take more effort to use. There is a good reason for those chemical additives. The following detailed description may seem overly fussy, but people who skimp tend to end up with loose tiles. It is best to do some experiments first, to make sure which consistency works best. It is also extremely important to thoroughly wet down the floor, wall or ceiling right before putting up the tile, or they will not stick (use a mop). The back side of the tile must also be wetted, before sticking it on, otherwise the moisture is wicked away too quickly. If the thinset is too dry, or the surfaces are not wetted enough, the tiles will tend to work themselves loose after awhile. With the commercial thinset, tiles can be slapped on and they will stick. With this recipe, they needed to be buttered with thinset, then pressed on for about ten seconds before letting go.
When doing wall and ceiling tiles, it was important to keep the room very humid so the thinset and grout did not dry too fast and become brittle. With the floor tiles, it was sufficient to cover them with plastic for at least 24 hours.
The tiles around the doors, the bottom of the walls and the backsplash were set on a steel mesh (degreased hardware cloth), which was attached to the wall with staples and galvanized roofing nails. This mortar will not stick well to aluminum on its own. There it was fine to let it cure in the normal dry atmosphere, though it was done with the house cool (around 50° F, 10° C) and closed up during the winter.
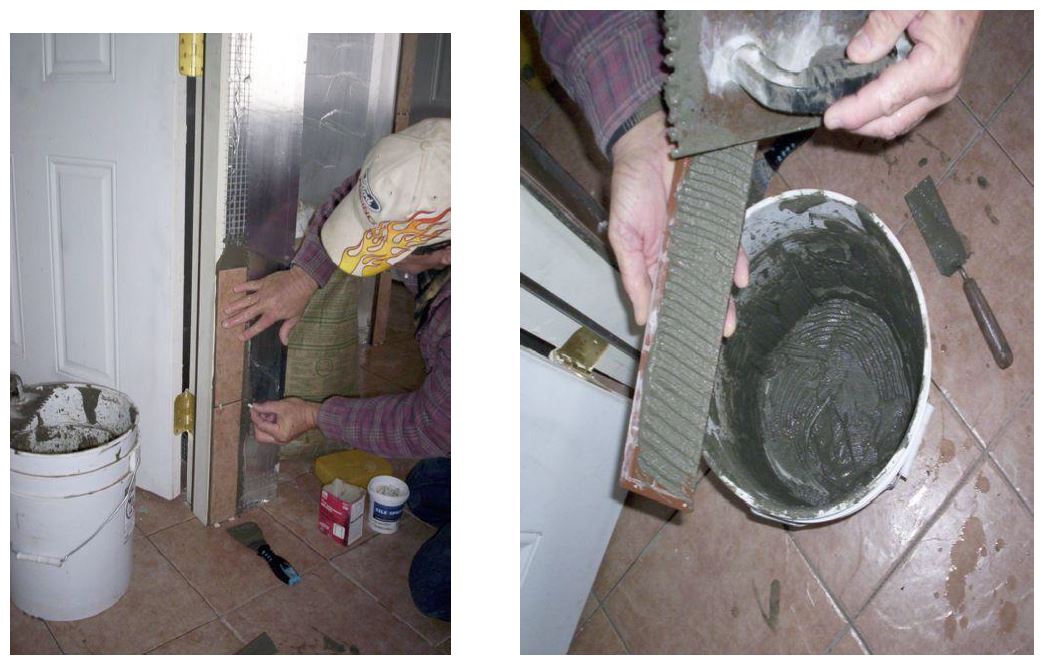
Setting the tile around door and baseboard, using steel mesh
(degreased hardware cloth) for extra strength in these areas.
The mortar cured fine, even when the moisture could only travel out through the grout lines (otherwise being sealed between the tile and the aluminum foil on the wall). This may take longer in a humid climate, though the alkaline cement should deter mold growth.
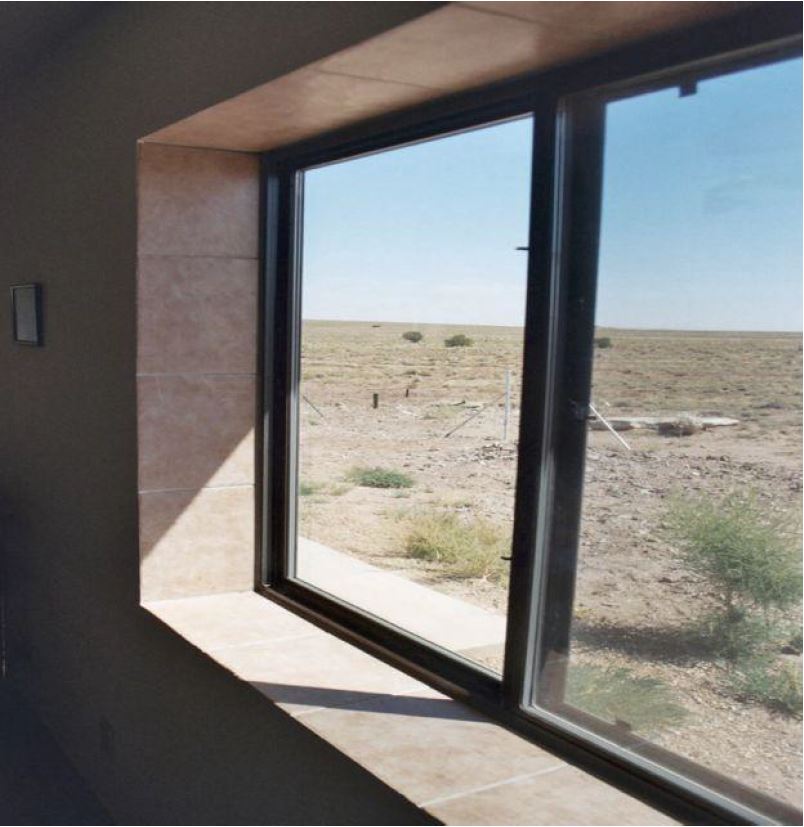
Tile work around the window, with HardiBacker cement board underneath
The thinset and grout use very fine 120-grit sand, which has a consistency like flour. It is difficult to find, as few people make their own any more. Locate a masonry supply store in your region. The bags may have to be shipped long distance. We used 600 pounds (300 kg) of feldspar 120-grit sand for this house.
Less-toxic thinset recipe:
- 5-1/2 cups 120-grit sand
- 4 cups portland cement
- 1/2 cup lime (calcium carbonate)
The cement content was increased for ceiling tiles.
Less toxic grout for 1/4-inch (1/2 cm) grout line:
- 2 parts 120-grit sand
- 1 part portland cement
Bathtub details
The bathtub was made of acrylic plastic and has not been a problem. Some people prefer porcelain covered steel tubs, though they are more expensive, with a very limited selection.
The walls around the bathtub were tiled, like the rest of the bathroom. The grout was sealed using the AFM grout sealer. Sliding shower doors keep splashes inside, and are much less likely to grow mold than a shower curtain.
Paint
Paint is the most troublesome issue when building an MCS house. Walls and ceilings have large surface areas, so the material put on them has to meet an extremely high standard to be tolerable. And many fail at it. There are many low-VOC and zero-VOC paints on the market, but that does not necessarily make them safe. Several MCS houses have been ruined by these paints.
For this house, the walls were painted with an experimental clay paint that is not commercially available and is a closely guarded secret of the inventor. This was the fourth house to use this paint, which works well so far.
If this clay paint had not been made available, the choice would probably have fallen between BioShield Kinderpaint, the Harmony paint and using Murco M-100. Either of those would probably have delayed move-in.
Some of these alternative paint methods, such as M-100 and the clay paints, are not as durable as regular paint. They can be damaged by splashes, seepage from windows or simply washing the walls.
The preservative-free clay paints are not a good choice in a humid climate, and should not be used in bathrooms. They may also not be suitable for houses using a swamp cooler.
Several brands of less-toxic paints have since become available, we have not tested them.
Caulk
Caulk is used many places in the house, such as around sinks and bathroom fixtures, and many other places. Caulk takes awhile to cure, and most of them emit a characteristic smell of acetic acid (vinegar).
Before the project started, samples of six brands of "100% silicone" caulks were tested, together with an aquarium caulk and the Phenoseal brand caulk.
Cabinets
The cabinets in the kitchen and the bathroom are made of steel with a baked-on epoxy coating. These were tolerable right away, and a lot of people in the area use them. Affordable cabinets of this type are difficult to find, but Fillip in Chicago makes a limited selection of styles, in only one color. They are made of rather thin steel, but they work okay. They came without a top (a top is available, but itís not well tolerated). A countertop was built using three layers of 1/2-inch HardiBacker boards, with a layer of large (18 x 18 inch) floor tiles on top, and fixed with thinset and grout. This came out looking very nice and has been very durable.
Sinks
The kitchen sink is stainless steel, of the thicker grade. Cheap, thin-walled sinks have problems with sound from the splashing water, which is dampened with sound deadeners that are usually made with a tar-like substance. A good alternative are porcelainized steel sinks, though they can be damaged if dropping things into them.
Utility closet
There is a utility closet on the side of the house which contains two gas water heaters. The closet is sealed off from the rest of the house so no fumes can enter the living space. The closet can only be accessed through a separate outside door.
Fireproof drywall was used for the closet. The drywall was sealed with aluminum foil, so the gypsum would not absorb any gas odors.
Air conditioning
The house is located at 5700 ft (1600 m) elevation, where air conditioning is not necessary for a well-built home. The heavy floor keeps the house cool during the day, while at night the windows are open to cool the floor down again. This works well in this climate where the outdoor temperature can vary forty degrees Fahrenheit (20 C) between day and night.
Accessibility
The owner intended to live in the house for a very long time, possibly to the end of his life, so the house was designed to accommodate various mobility issues of old age, as they are much easier to install when the house is built. These include:
- all doors wide enough for a wheelchair
- grab bars in bathroom
- ADA certified commode
- wheelchair ramp to front door
- windows that slide horizontally
- bathroom has room for a wheelchair
Acknowledgement and disclaimer
The success of the houses built in this area is due to a single person, Bruce McCreary. He thought of the majority of the special building details that have been described in this document, such as the system for sealing the walls using aluminum foil. His contribution to healthy house construction is greatly appreciated.
This building method is considered experimental. Neither the author nor Bruce McCreary is liable for any results using this information.
For more information
Detailed articles about the construction methods used in this house are available on www.eiwellspring.org/saferhousing.html.
Additional articles about Desert Moon House can be found on www.eiwellspring.org/housingcases.html.
Vendor List
Many of the larger vendors are not willing to respond to queries from individuals. It is usually best to find a local supplier that carries their products, or can order them. The companies may supply a list of vendors in a given area. Some of the listed vendors are small companies, which welcome customer contacts by phone or e-mail.
Alufoil (0.001" soft aluminum foil - part no. 210SR36X225AL)
631-231-4141
www.alufoil.com
MI Windows (Regal View aluminum frame windows with thermal break)
1-888-376-4230
www.miwd.com
Grainger (Dayton Electric water pressure tank)
1-888-942-6700
E. L. Foust (acrylic aluminum tape)
1-800-353-6878
www.foustco.com
Fillip Metal Cabinet Company
1-800-535-0733
www.fillipmetal.com
Hyde (wallpaper tools, SKU 45808)
1-800-872-4933
James Hardie (HardiBacker boards)
1-888-542-7343
www.hardibacker.com
Johns Manville (formaldehyde-free fiberglass insulation)
www.jm.com
Metal Sales
1-800-289-7663
www.metalsales.us.com
Marvel Masonry & Supply (120-grit sand)
Phoenix, Arizona
602-971-2710
Murco (M-100 joint compound)
1-800-446-7124
www.murcowall.com
Sto-Cote (Tu-Tuff vapor barrier)
262-279-6000
Red Devil (Red Devil TSP cleaner)
1-800-4ADEVIL
www.reddevil.com
2009 (updated 2017)