How I built my reading box
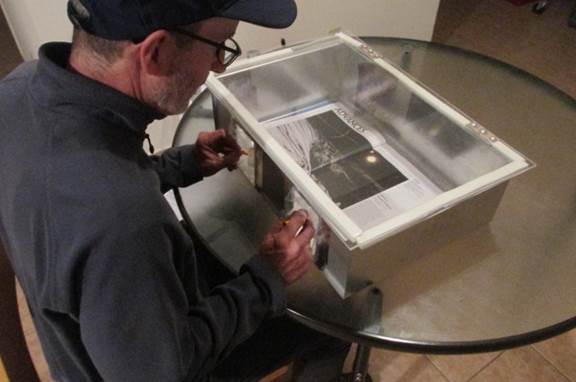
Here is how I built a durable non-electric reading box to protect me against the fumes from books and magazines.
Keywords: reading box, how to reading box, unvented, non-electric, mold sensitivity, adaptive technology, multiple chemical sensitivity, MCS
I get dizzy and my sinuses flare up if I read a book or magazine. Since I am also electrically hypersensitive, I can’t use an electronic book reader (Kindle) or a computer to read.
I have used reading bags and then a reading box for many years, but the reading box wore out.
Since reading boxes are no longer available to buy, I decided to design and build my own. It needed to be durable, easily repairable, and lightweight. I wanted one I could move around easily on a daily basis, without causing wear on it, and so I could keep a book inside for days.
I wanted to do most of the work myself, thought I did have to hire a metal shop to cut and bend the metal pieces.
Since I am electrically hypersensitive, a friend helped ordering the materials on a computer, and operated the power drill.
The following are detailed instructions on how we built my reading box. They may seem overwhelming and too detailed, but if you are actually doing this, they can save you from a lot of problems.
I include a set of drawings, which were used by the metal shop to make the pieces.
The cost
The materials cost about $300, while I paid the metal shop $100 to cut and bend the aluminum sheets (2023 prices).
The materials cost so much because they were ordered online in small pieces. That was premium prices for sure. If a local shop had them in stock in larger sheets and could cut off what I needed, it would be a lot less. Finding leftover pieces would have cost even less.
Other than the cutting and bending of the aluminum sheets, we did the work ourselves. It did not require expensive tools or special skills.
If you hire someone to do all the work, the cost can be a lot higher. One person with all the tools and materials at hand should be able to do the entire project in two days or less. Because of my situation, and screwups at the metal shop, it actually took months to build my box. Most of this was just waiting (more on this later).
It may be more cost-effective to hire a handyperson for most of the work, with a metal shop doing the cutting and bending. The cutting and bending is about a one-hour job for someone skilled doing such work.
Cutting and bending
I did not have the tools to cut and bend the aluminum sheets, so I sent the sheet and drawing to a metal shop that did it. They did not normally work with aluminum and didn’t have a supplier that had the needed alloy, so we ordered the sheet and had it sent directly.
There are various types of shops that can work on metal sheets. That includes “metal shops” and roofers who install steel roofs. We used a reputable welding shop.
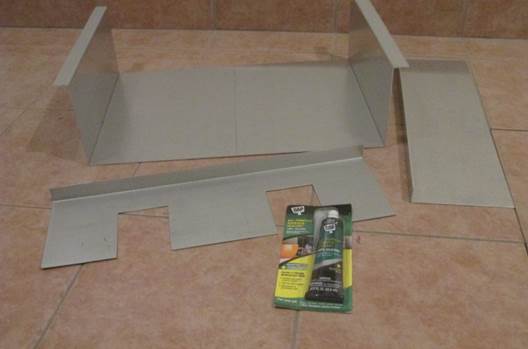
The three aluminum pieces as they came back from the metal shop.
It is simple work. A skilled person can do the cuts and bends in about an hour.
The drawing the shop used to do this is included on a link at the bottom of this article. The measurements are shown in both American and Metric units. Cross out the ones that are not applicable to avoid confusion.
Cutting the lid
The lid was cut from a sheet of clear polycarbonate.
I needed a special scoring tool to make a deep groove before the sheet was broken over the edge of a table. The tool was cheap and available from the same online vendor that sold me the plastic sheet.
The sheet came with protective covers on both sides, which I left in place until the box was finished. They protect the plastic against scarring.
Installing the lid
Attaching the lid to the back panel is easier to do before the panel is mounted in the box.
Tape the hinge to the lid and then gently drill the holes through the plastic sheet. It can help to put a loose rivet in the first hole to hold the hinge in place while drilling the next two holes.
Installing the first rivet on the hinge that is held in place by two loose rivets.
To hold things in place for the first rivet, I placed loose rivets in the two other holes. Before doing the riveting, I placed a washer around the hole to help protect the plastic lid.
I attached the two hinges to the lid first. Then proceeded attaching the hinges to the top flange on the rear aluminum panel.
Installing the panels
The front and back aluminum panels were installed next. Make sure the top flanges are facing out of the box.
Place a panel so it rests slightly inside the box. This makes the box stronger.
A piece of aluminum tape on top can hold the panel while you caulk.
I used aquarium caulk to mount each panel, and make the seam airtight. You may want to caulk both sides of the seam.
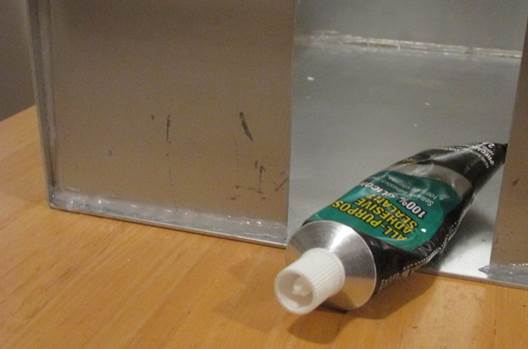
Using aquarium caulk to attach the front panel, so it rests on the bottom part of the box.
Aquarium caulk has no herbicides in it, unlike regular caulk. I did this work outdoors while wearing a respirator, then left it in a shed to offgas for several days.
Installing the handles
Inspect the two openings on the front. If the sides and top do not have smooth edges, use a file or wrap them with aluminum tape. Otherwise, the flexible plastic will soon chafe on the edges.
Cut out a piece of plastic from a suitable flexible-but-tough material. It should be square and about 10 x 10 inches (25 x 25 centimeters). I cut open a plastic bag.
Cut a tiny hole in the center of the plastic sheet. Then stick a pencil through the hole, so half the length sticks out on each side.
Roll the pencil about one turn, so the plastic is wrapped tightly around one end of the pencil. Make it cover the end that does not have the eraser head.
Fixing a pencil to the plastic.
Mounting the pencil-and-plastic while the box is tilted.
Attach the plastic to the pencil using aluminum tape. Cut a piece of 1 x 2 inches (2 x 5 cm) and wrap it around the pencil so it holds on to both the plastic and the pencil.
Place the box on a table with the two openings facing up.
Cover one opening with the pencil-and-plastic assembly. Make sure the eraser head is inside the box.
Push down on the pencil, so the place where the plastic is attached to the pencil is 3 inches (8 centimeters) inside the box (down in the hole). This makes the pencil more maneuverable.
Trim the plastic and affix it to the front panel with aluminum tape so there is an airtight seal.
Installing the gasket
The gasket seals the flange at the top of the box against the lid. The flange is unlikely to fit perfectly on its own, both due to the hinges and imperfect workmanship at the metal shop. The gasket fills the gaps.
The material to use needs to be non-toxic and “spongy.”
I used pieces from an old cotton bedsheet that I rolled up and placed on top of the flanges. It is held in place with aluminum tape.
The pieces for the sides were 14 inches (35 cm) long and about 12 inches (30 cm) wide. Rolled up they were about an inch (2.5 cm) wide. The front needed a much thinner gasket.
The back flange has three pieces to fit around the hinges.
Make the aluminum tape bulge across the gasket, so it is flexible and seals better against the lid.
Cutting the cotton bedsheet to use as gasket.
Installing the gasket.
Check that the gasket actually touches the bottom of the lid all the way around. It is difficult to see. Pushing a small piece of paper under the lid to check for resistance works well. If it doesn’t seal well, you can use spring-loaded clamps to hold it together.
Pads
I added four self-adhesive pads to the bottom of the box, so it won’t scratch a table.
Peel the protective cover
The plastic lid came with a protective cover on both sides. I waited until now to peel it off, to avoid scratching the lid during the work.
Cleaning and offgassing
I cleaned and offgassed the materials along the way to protect myself. This slows down the project. If the person doing the work does not have severe MCS, this can all be done at the end.
When the aluminum pieces arrived from the shop, I cleaned them with vodka. I did this work outdoors. The pieces did not look dirty, but the paper towel clearly became stained.
The pencils I already had; if new I think they need several weeks to offgas the wood terpenes, so buy them early.
When the box was finished, I let it sit with the lid open for a week before I used it. I’m not sure that was necessary, but I can react or get sensitized to things I cannot smell. Better safe than sorry.
Maintenance
This design will need very little maintenance. If the gasket wears out, simply pull it off and install a new one.
The pencils will last a long time, though the plastic around them may need replacement after several years. Simply pull off the old plastic-and-pencil and install a new one.
If the lid needs to be replaced, use a drill to remove the rivets on the hinges. Then install a new lid.
Note that the lid can be scratched if things are put on top of it.
Once a year, you may want to wipe off the film of ink-fumes that will accumulate on the inside. Vodka works well.
The materials
The materials were chosen carefully to make the reading box lightweight, durable and chemically tolerable. They were mostly ordered on the internet.
A materials list is at the end of this article. You can skip this section if you’ll simply follow our list, but read on if you want to try anything different. You may want to know why we made these choices.
The box itself is built of an aluminum alloy called “4043,” with a semi-shiny surface finish. The thickness is 1/16 inch (1.5 millimeters).
Pure aluminum will not work, as it is too soft. I was told other suitable alloys are “5052” and “3003.” They are all strong and bendable.
If you decide to weld the box together, check that the alloy is weldable. It is more difficult to weld aluminum than steel, so you’ll need a skilled person.
I chose a semi-shiny aluminum finish as a glassy surface could have irritating reflections of light, especially reflecting from the bottom. Much aluminum comes in “mill finish” which is a rougher surface that tends to have a metallic smell that never goes away.
The thickness of 1/16 inch (1.5 millimeters) makes the box sufficiently rigid to be carried around.
The lid is 1/8 inch (3 millimeters) clear polycarbonate plastic. I chose this material as it is very tough and I tolerate it well. I think acrylic plastic (Plexiglass/Perspex) should work well too.
The aluminum pieces were caulked together, using aquarium caulk. Regular caulk is so toxic it actually kills fish if used for an aquarium, while this special caulk does not.
The pieces could have been welded instead, but we could not do the welding ourselves and didn’t trust anyone else to do it. It would be impossible to correct a screwup, and costly to redo. (The metal shop made other screwups, so caution is warranted.)
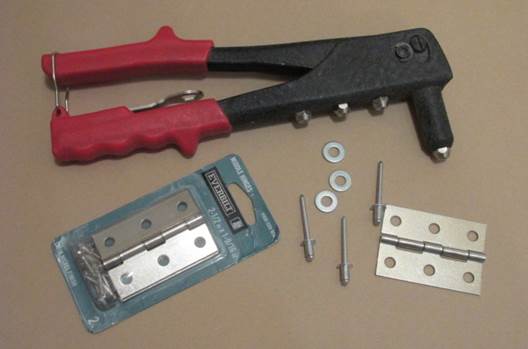
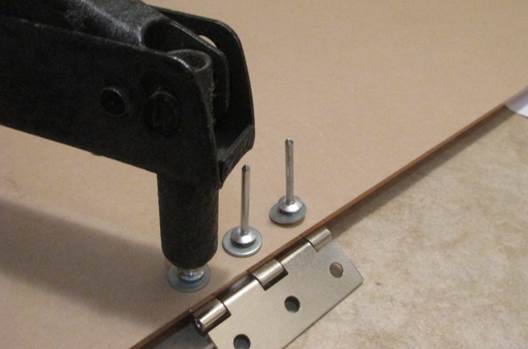
The riveting tool and the hinges.
The hinges are basic “middle” cabinet hinges. We used two that were 2 1/2 inches (62 millimeters) long and 1 9/16 inches (40 millimeters) wide with three screw holes on each side. The holes are about 3/16 inch (5 millimeters).
The handles are ordinary pencils with an eraser at one end and NO sharpening at the other. Both features are important.
The plastic around the two pencil handles must be tough, flexible, and tolerable. Meeting all three criteria was not easy. I tested several plastic bags, some stunk, some were too flimsy, others too stiff. It has to be right.
Originally I cut the pieces from a regular reclosable one-gallon (3.8 liter) storage bag from the grocery store. These are made of PVC plastic. But after two months of daily use I became sensitized to it, and got dizzy when using the reading box.
I then used pieces from a reclosable storage bag made of polyethylene. These bags are sold at healthfood stores and are marketed as “BPA free” or “PVC free.”
The gaskets for the lid are made of rolled up pieces of old cotton bedsheets. An old T-shirt may work too. The gaskets must be soft and springy. Don’t use any cotton that has ever been washed with toxic detergents or fabric softeners, or even washed in a laundromat.
I used aluminum tape to hold the plastic sheeting and gaskets in place. The glues on these tapes vary, I prefer an acrylic type sold by E. L. Foust in Chicago.
List of materials
Aluminum sheet, semi-gloss, 4043 alloy.
Thickness: 1/16 inch, 1.5 mm.
Minimum size: 36" x 30" (85 x 70 cm).
Polycarbonate plastic sheet, clear.
Size: 24 x 24 inches, 60 x 60 cm.
Thickness: 1/8 inch, 3 mm.
Middle cabinet hinges.
Size: 2 1/2" x 1 9/16" (about 6 cm long).
Rivets, 3/16 inch, 5 mm.
Pencils with eraser head, not sharpened, generic brand.
Plastic gallon reclosable storage bag (Natural Value, PVC-free).
Aluminum tape (E. L. Foust, acrylic).
Cotton bedsheet (old, never washed with toxic laundry products).
Self-adhesive pads, generic brand.
Hiring people
If you hire people to do the work, try to protect yourself against costly screwups. It is often surprising how many things can go wrong. Monitor the work along the way if you can.
Regular people simply do not understand that the choice of materials really matters. For instance, if you specify aquarium caulk, they may have a regular kind on hand and to them that is just as good.
Ordinary screwups can also happen. The welding shop I hired to cut and bend the plates forgot to do two of the bends. This even though they had clearly marked bend lines and written “BEND” on them.
Because the shop was far away, I asked a local shop to do the missing two bends. That was a mistake. They did one bend correctly, the other piece they bent in the wrong place, apparently not seeing the word “BEND” and just making a guess.
Many people who work in the trades are not used to following written instructions. They are more used to learning by seeing. It may not work to hand them these instructions. You may need to be present and read this aloud and discuss each step. (This may be a cultural issue and not applicable to other countries.)
I highly recommend that you order all materials yourself so you are sure to get what you need and not what the contractor may substitute with.
More information
The drawings used by the metal shop are here: www.eiwellspring.org/ei/ReadingBoxDrawing.pdf.
2024